Banana Hair Masks: Benefits, DIYs, and Facts for You
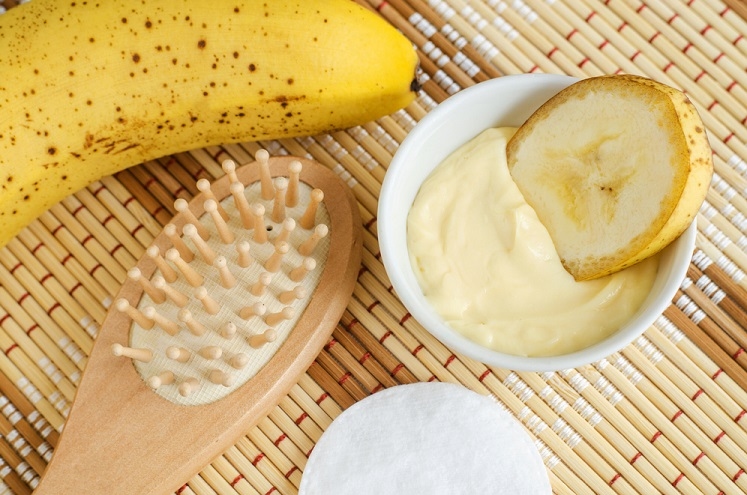
Fresh bananas have a wide range of health benefits, as well as having a delicious flavor and aroma to go along with them. Did you ever wonder if bananas could be used to make your hair thicker, shiner, and softer? Wouldn't it be great if they could?As a result of the silica found in bananas, your body may be able to synthesize more collagen, which will eventually result in stronger and thicker hair. It has been scientifically proven that bananas do not only have antimicrobial properties, but they also help to treat flaky and dry scalps, reducing the symptoms of dandruff as well. Currently, banana hair masks are very popular because of their ability to condition and soften hair, which makes them very effective for hair care.When it comes to taking care of your hair, banana hair masks are a great starting point. Bananas are a fantastic ingredient for hair care. Even though you might think that mashed bananas on your hair are just as good as banana hair masks, there is a surprising difference between the two. It is important to note that the problem with banana hair masks is that we do not know their effectiveness. The following are some home remedies that may be of benefit to you if you read on. What do bananas have going for them? The banana not only makes a convenient snack for carrying, but it can also provide a lot of nutrients. The potassium content of bananas is one of the highest in the food industry. There are many ways you can get potassium in your diet, such as fruits, vegetables, and even meat, but one banana alone can provide 25 percent of what you need each day when it comes to potassium. Bananas are rich in vitamins and minerals, such as vitamin B6, vitamin C, potassium, fiber, magnesium, and dietary fiber. Bananas have sufficient amounts of these vitamins and minerals. Even so, bananas do not have a high-fat content and are generally low in calories; they have anywhere from 80 to 120 calories for a medium-sized banana, depending on the size. In addition to three essential amino acids, there are also high-quality proteins in them. The amount of vitamin B6 in bananas is believed to be 40 percent of what a person needs on a daily basis. There are, however, some people who do not enjoy eating bananas on a daily basis. The best way to ensure you are getting enough fruits and vegetables in your daily diet is by taking a high-quality vitamin supplement if you prefer not to eat bananas.When you use a homemade banana mask, you will be able to fix damaged hair, nourish the scalp, and leave your hair with a lustrous, healthy look and feel. When using ripe bananas for this mask, it is recommended that you apply it once a week for the best results. Bananas are rich in several natural ingredients which can be combined with them in order to treat a variety of different health problems. Various types of hair masks can be found in the market, such as avocado and banana hair masks, banana egg hair masks, and many more. DIY Hair masks made from bananasFor a simple banana hair mask recipe, check out these recipes. Hair mask with banana and eggIt is particularly beneficial for promoting hair growth and achieving sleek, glossy hair with this simple two-ingredient hair mask. Based on the results of a study conducted in 2020, it has been found that egg proteins promote the growth of hair.The following are required:Your hair length will determine how many ripe bananas to use (1 or 2)One eggPut the bananas and cracked an egg into a blender or bowl after peeling and mashing them between your hands.A consistent, even texture should be achieved by mixing the mixture.Ensure that you pay special attention to your scalp and split ends when applying this product to your hair.You should leave it in for 15 to 25 minutes.Make sure your hair is thoroughly rinsed out. To prevent the egg from becoming absorbed by your hair strands, use lukewarm water.Hair Mask with Bananas and YogurtDuring the summers, when your poor hair has been fried by the sun's scorching rays, you will be glad to know how useful this mask will be for you. If your hair is damaged by brittleness, then use this luxurious and creamy hair mask to repair it. YogurtA yogurt DIY hair mask is an excellent method of maintaining and deep conditioning your hair on a regular basis. The consumption of yogurt may not only reinforce and promote healthy hair, but it may also find a way to speed up the growth of slow-growing hair. Protein in yogurt improves the health of your hair. It keeps your hair nourished and strengthened without making your hair dull or brittle. By aiding in the circulation of blood, yogurt's zinc and lactic acid content contribute to the growth of cells. Follow these instructions: Add yogurt to bananas, honey, and lemon juice to a small bowl. Mash bananas.To add a sweet scent to your hair, add a few drops of your favorite essential oils.To use, apply to damp hair and comb through with a wide-tooth comb once the mixture is smooth and creamy.Relax for 10-15 minutes by putting your hair in a shower cap.Use lukewarm water to thoroughly rinse your hair. Normal shampooing and conditioning should be followed.How bananas can benefit your hairThere are a number of vitamins and other nutrients that are found in bananas that can nourish your hair and keep it healthy. Banana hair masks offer a number of benefits, some of which are listed below: Nutrient-denseCompared to other fruits and vegetables, bananas provide more vitamins A, B6, and C, as well as potassium and sodium. You will see an improvement in the shine of your hair as a result. Preventing hair lossEating bananas is one way to soften your scalp because they maintain your hair's natural elasticity as a result of their nutrient content. A natural method of absorbing silicaIf you eat bananas, your body absorbs silica, which aids in the formation of collagen, which is essential for healthy hair. Frequently Asked Questions about Banana Hair Masks Is banana peel good for hair growth?That's right. Banana peels contain antioxidants that neutralize free radicals in your hair, which means that your hair is healthier and stronger. When bananas are ripe and fresh, they should be peeled as soon as possible. Thus, a healthy scalp is also responsible for long, luscious hair, which is formed from the combination of these factors. How do bananas affect hair?Bananas contain substances that, if left on the scalp after you have washed them, can cause irritation and itching. It is important to note that if banana hair masks are not thoroughly washed out, they may actually promote more dandruff. You should not let your hair completely dry after you have applied the mask. Applying a hair mask too frequently can cause your scalp to become oily and greasy, which can lead to dandruff on your head. As well as this, if you have a latex allergy or are otherwise sensitive to latex-acting fruits, you should never apply bananas to your skin. Is curly hair straightened by bananas?It is not at all true. There is no way bananas can straighten naturally curly hair. With banana hair masks, you can reduce the frizz and shine on curly hair while also reducing the amount of tangles. Is a banana hair mask suitable for oiled hair?As a result of the oil, you are unable to apply the mask to your scalp or hair, nor is it able to absorb into them. Your hair and scalp will not benefit from this treatment, so you will not see any noticeable improvements. It is essential that these masks are applied on unoiled hair in order to achieve maximum results. ConclusionThere are a number of factors that can cause our hair to be damaged continuously, including heat styling, coloring, pollution, and other factors. In order for our hair to recover from damage caused by basic shampooing and conditioning, they need adequate cleansing and moisturization. It is important to step up our hair care routine by deep conditioning it once a week with a hair mask to boost its health and strength so that it will last longer and look better.Using the same ingredients that have given bananas their soft, chewy texture, you can use the same substances to soften and condition your hair. As far as banana mask treatments have been studied, they have not been extensively reviewed, but they can be an effective home remedy for hair problems such as dandruff and brittle hair.