Tips To Apply Contour Face Makeup Like A Total Pro

Let’s just come straight to the point. There might be thousands of makeup tutorials out there, but learning how to apply contour face like a pro is a tricky job. If you are still struggling with contouring your face and achieving that Kylie Jenner look, we are here for you!
Beauty experts at WomenWire will walk you through the process from start to finish. We will explain what makeup brushes you will need, the kind of colors you will need to choose, and where exactly you should place your contour face makeup products.
Let’s jump right into it!
Steps to get the contour of your dreams!
Step 1
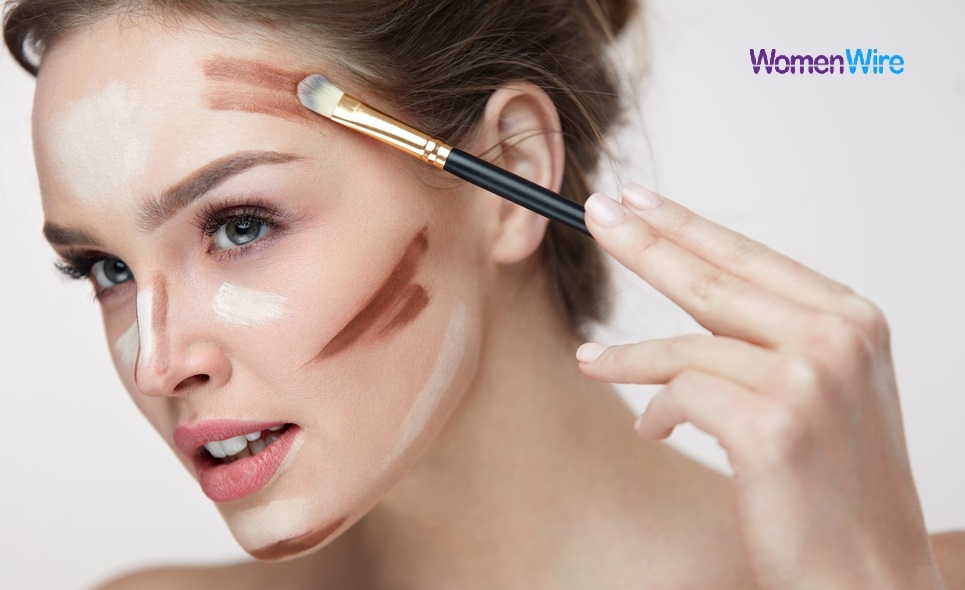
Contouring your face
Before you begin with contouring, you need to ensure that your foundation is all set and in place. Set your foundation makeup with a translucent powder.
Now, feel free to work with any contour face makeup product you are comfortable with. We are going to be using a powder contour to explain the process.
Pro Tip: While selecting the right color for your contour face makeup, choose a color on the neutral or cooler side. This way, the color will actually mimic a shadow.
Now, coming back to the technique. Use a contouring brush and start applying the product to your temples. Work your way up in a circular motion, simultaneously with sweeping motions.
Ensure you are working the product into your hairline as well to avoid all kinds of harsh lines on your face.
Coming to your cheekbones, the rule of thumb is to place the color directly underneath them. Start by using an angular contouring brush and move the product towards the corners of your mouth. The closer your product gets to the edge of your mouth, the sharper your face will look.
But, of course, for obvious reasons. Do not exactly go from ears to lips with your contour. There should be a gap between the contour face makeup and the edge of your mouth.
If you would like to start contouring other parts of your face, you can use the same brush. For instance, if you are contouring your nose after your cheekbones, you can do so with the same brush. Just hold the bristles really together for that well-defined look. Create two parallel lines down your nose, going into the creases around your eyelids. Again, this is completely optional. You can also add a little contouring around your chin to create that “V” look you are aiming for.
Pro Tip: Little goes a long way. Don’t go overboard with contour makeup.
Step 2
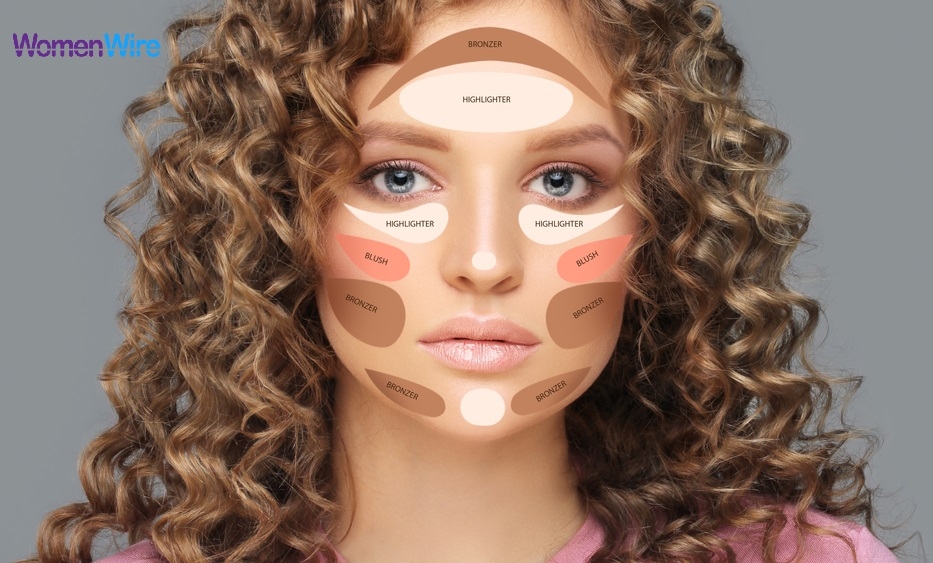
Placing your highlighter
When looking to highlight your face after contouring it, pick out a product with a similar undertone as yours. Additionally, you should choose a highlighter that is one to two shades lighter in comparison to your foundation.
To apply the highlighter correctly, use a more precise contouring brush. Place the highlighter towards the center of your forehead, lightly, just dusting the brush against your forehead. The same goes for the top of your cheekbones and then sweeps the same brush without dipping it back again around your jawline. All this should be done ever so slightly.
If you have contoured your nose as well, place the highlighter in between the shaded region.
Step 3
Bronzing up your look
Whether you are looking for a just-out-of-a-tanning salon glow or are looking to carve out your special features, bronzer does everything!
For that subtle summertime look, sweep a shimmery bronzing shade around your temples, sweeping down to your cheekbones. Then bring your bronzer to your chin from the bottom. Follow these three steps and move your brush around these three places on your face in a 3-shaped motion.
You will get an instant beachy, sun-tanned glow!
Pro tip: If you want a noticeable glow, dust your bronzer onto the tip of your nose as well. Sun hits here directly!
Step 4
Finish it off with some blush
The final step to finishing off your look is by applying some blush. Blush offers you a major dimension. You can easily fake that dazzling and glowy flush by grabbing any blush of your choice, dipping a fluffy brush into it, and working it around the apples of your cheek. Work your way up to your hairline as well.
From top to bottom, your cheeks must read - Highlighter, blush, and contour!
Contouring according to your face shape
Contouring is not going to go anywhere for a while! Once you know the basics of contouring, it is now time to understand the right way to use contour face makeup as per your face shape.
Of course, contouring is not a one-size-fits-all kind of practice.
Determining your face shape is, therefore, an integral part of contouring. There are four major kinds of face shapes - round, oval, square, and heart.
To determine your face shape, simply go to your nearest mirror with an old kohl pencil or a lip liner. Your hair must be pulled back for this activity. Start outlining your reflection on the mirror. Follow the outlines of your entire face. Once you have made a rough outline on the mirror, observe the shape that comes out. You will get a close enough idea of your face shape.
Round Face
Round face shapes often lose their definition after the base makeup is applied. Therefore contouring round-shaped faces needs to be full of shadows and adding angles.
Accentuate the cheekbones on a rounder face. Contour just below the cheekbones. Make that iconic duck face to really get that shape correct. Contour along with your forehead and temples as well, in the form of the letter “C.”
Round-faced beauties should not be shy of a highlighter!
Pro tip: For round-faced people, eyebrows are key. Angled, arched brows bring more dimension to the face and break up the curviness. Experiment with your brow pencil and have fun!
Oval Face
Just like the round face type, an oval face type also comes with a rounded jawline. The only difference here between these two face shapes is the elongation of the face. Bella Hadid has an oval face. The forehead for oval face shapes brings out the widest areas.
For oval face-shaped beauties, rely on blush to do wonders for you. Blush will add that depth and dimension you need. Bounce your blush around the apples of your cheeks and below your chin to get that well-rounded look that brings your best features forward.
An oval face is already pretty symmetrical, so you can easily focus on contouring under your cheekbones. You are good to go!
Heart Face
To get a clear view of this face type, imagine Reese Witherspoon. She has a wider forehead and has a pointy and angular jawline.
Apply your highlighter along the bridge of your nose, the top of your cheeks, and around your upper jawline. For the contour, sweep it across the sides of your forehead to minimize its overall width.
The jawline of such a face shape is already defined well. So, heart-faced beauties will only need a touch of contour face makeup below their chins. Blend the contour correctly, add that touch of bronzer and blush, and you are all set to hit the town!
Square Face
If your face shape resembles Katie Holmes’ face shape, your cheekbones, temples, as well as your jawline will already have defined angles. They are also pretty symmetrical and equally placed away from the center of your face.
Contouring a square face shape requires softening the edges. You need to work on rounding up your angular features. So, contour around the perimeters of your face and blend it nicely to get that natural look.
Pro Tip: For a square face shape, you need to remember highlighting only around your forehead, chin, and the bridge of your nose. You can also add a touch of highlighter under your eyes and right below the corners of your mouth for some fun.
So, there you have it! Start practicing the right ways to apply contour face makeup like a total pro. You have all the techniques, and your face shape is set out for you!
This content was created by AI